
Interpreters

image
image
image
Version: 2.1.9
© 2025 PYE Tech. All rights reserved.

Interpreters

This page explains what Curator's Interpreters are, what they are for, and how to work with them from start to finish: creating the recipe, assembling the steps, registering the inputs, testing, reading the result, measuring quality, and reviewing history. The content is aimed at process analysts, business people, and automation developers, and requires no prior technical knowledge.

Overview

An Interpreter is an artificial intelligence recipe. You hand over a piece of information, that information goes through one or more analysis steps in sequence, and at the end you receive a result ready to use.

Input -> Step 1 -> Step 2 -> ... -> Final result

The word "recipe" is not accidental. Just like a cooking recipe, an interpreter has declared ingredients (the inputs), a step-by-step preparation method (the steps), and a predictable final dish (the output). And you write the recipe only once: from then on it can be used as many times as you want, by different people and in different processes, always the same way.

The core idea is to separate the job of understanding a piece of information from the rest of the process. Instead of scattering loose artificial intelligence instructions inside each automation, you concentrate that knowledge in an interpreter that has a name, can be tested, and can be audited.

The problem this solves

Many processes stall at a step that is not mechanical: someone has to read a document, understand what is written, and decide what to do. Examples that show up in almost every company:

  • Read an official letter and extract name, document number, and deadline.
  • Classify a customer message as praise, complaint, or question.
  • Summarize a long contract into three objective points.
  • Read the text of an email and identify which department should handle the subject.
  • Look at a photo of a document and transcribe only the fields that matter.

Without interpreters, each automation would solve this its own way, with an instruction text hidden inside the code. When results got worse, nobody would know where to change it or how to compare before and after.

With interpreters, this step becomes a first-class item inside Curator: it has its own name, an execution history, measured cost, and it can be given an accuracy score.

Basic concepts

There are only a few concepts, and it is worth understanding each one before opening the screen.

Concept What it is, in plain language
Interpreter (or recipe) The complete package. It has a name, a description, a default artificial intelligence model, the inputs it needs to receive, and the list of steps.
Step (or interpretation) A single reasoning stage. Each step has a title, a written instruction, an artificial intelligence model, and the inputs that step consumes. Steps always run in order, one after the other.
Input The information you provide when using the recipe. It can be text or an image. Each input has its own name, and that name is used inside the instruction.
Variable It is how the input appears inside the instruction text, written between double braces. If you created an input named texto_do_oficio, in the instruction you write {{texto_do_oficio}} at the exact point where the content should be inserted.
Instruction The plain-language text that tells the artificial intelligence what to do with that step's inputs. It is the heart of the step.
Final result The output of the last step. It is always text. The format of that text is defined by your own instruction: you can ask for a single word, a list of bullet points, or lines in the field = value style.
Important detail
Not every input of a step comes from you. A step can consume the result of the previous step, or the result of a specific step further back in the flow. That is how multi-stage reasoning is assembled, and it is what the Inputs and chaining section covers in detail.

When to use an interpreter

Use it when the step involves understanding language or images, not just applying fixed rules. Good signs that an interpreter is the right tool:

  • The input text changes format from case to case.
  • The rule is easy to explain in plain language, but hard to write as a rigid condition.
  • The same reading repeats across several company processes.
  • You want to measure answer quality and compare artificial intelligence models.
When not to use it
Do not use it when the rule is always the same and simple. If the data is always in the same position of a structured file, a plain extraction is faster, cheaper, and more reliable than asking artificial intelligence to read it.

The full journey, from first click to a finished recipe

Before going into the details of each screen, it is worth seeing the whole path at once. The following sections go deeper into each of these stages.

  1. Open the module. In Curator's side menu, click Interpreters. If you have not created any recipe yet, the screen shows the Create your first recipe invitation, with a creation button and a list of ready-made templates right below. If you already have recipes, you see the Your recipes list, with search by name, the Monitor button, and the New interpreter button.
  2. Create the recipe. The New interpretation recipe window asks for only two things: a name and a starting point.
  3. Assemble the flow. Add the steps, choose the model for each one, and write the instructions.
  4. Register the inputs. Declare what the recipe requires and fill in example values for testing.
  5. Test and read the result. Run it and watch the flow diagram light up step by step.
  6. Review the history. Check every execution, with consumption and estimated cost.
  7. Adjust and repeat. Fix the instruction of the responsible step and test again, until the recipe stabilizes.

Starting points when creating a recipe

Choosing a ready-made template already creates the first step with a working instruction. That shortens the beginning considerably: instead of facing a blank screen, you adjust a text whose structure is already correct and only needs to be adapted to your case.

Starting point What it delivers
Start from scratch An empty flow, to build everything your own way.
Extract data from a text Reads a text and returns the requested fields, one per line.
Classify into categories Reads a text and returns a single category from a list you define.
Summarize content Turns a long text into a few objective bullet points.

At the end you can click Create, which opens the recipe, or Create and test, which opens the recipe with the input window already ready for the first test.

The recipe flow diagram

When you open a recipe, the center of the screen is a diagram representing the path of the information, always from left to right.

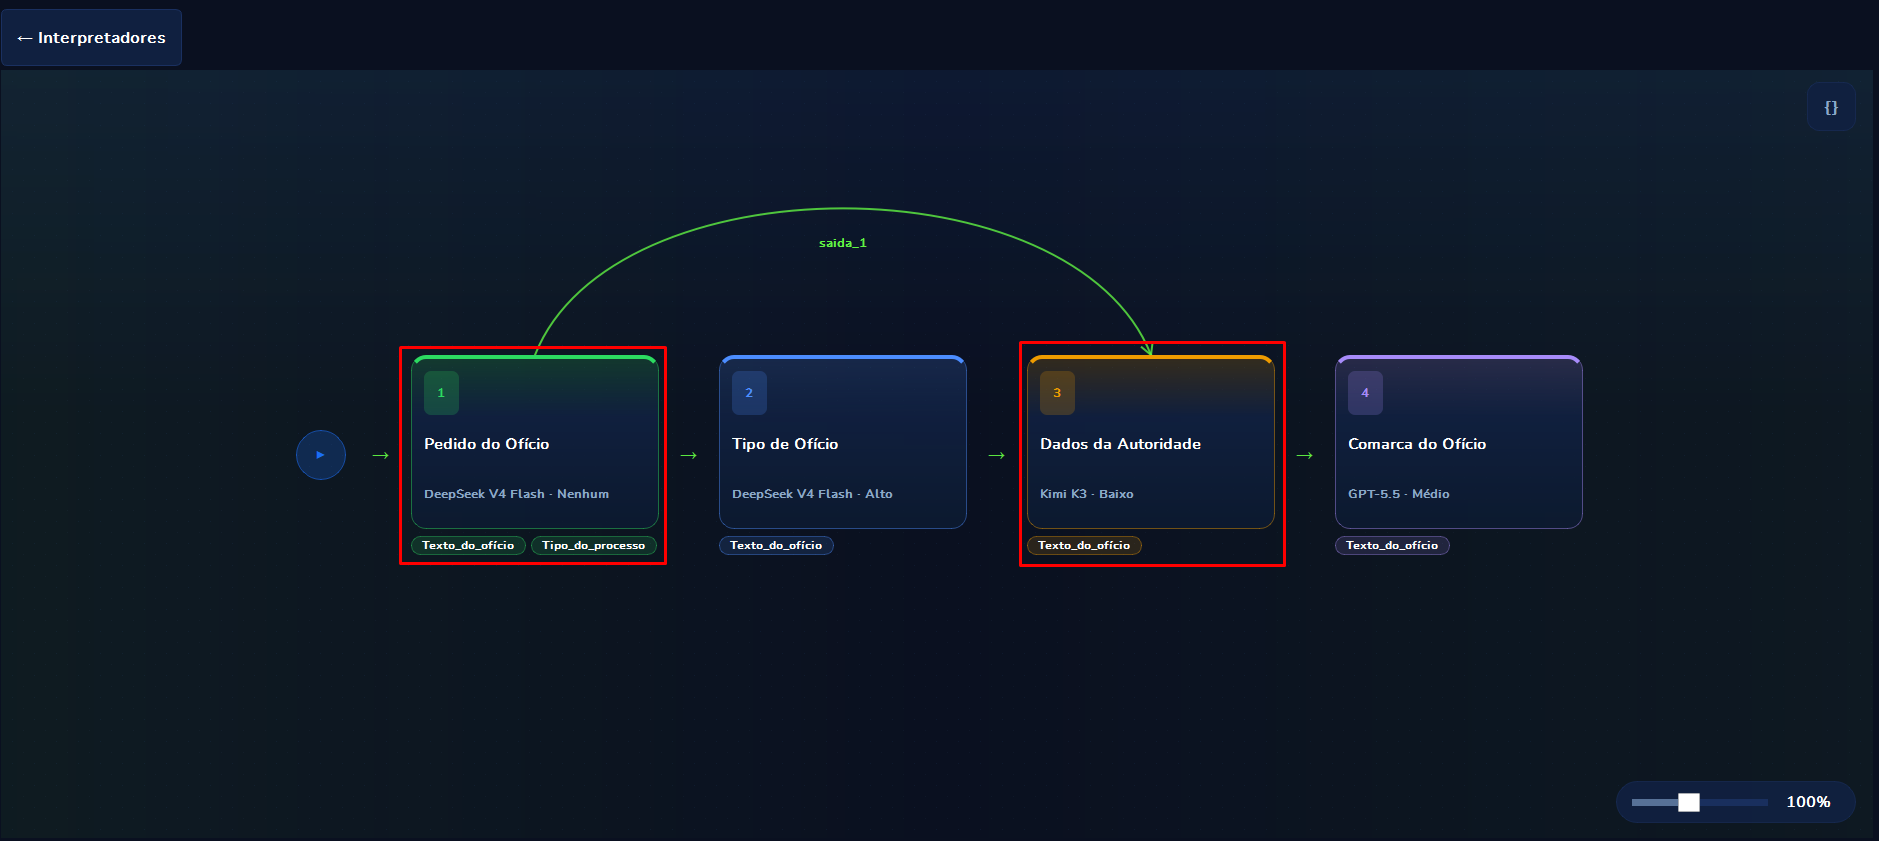
Flow diagram of an interpreter in Curator, with four steps in sequence and an arc connecting the result of step 1 to step 3

The image above is a real four-step recipe that handles a court order. It is worth walking through what each element on screen is saying, because it is everything you need to read in order to understand any flow:

  • The circle on the left is the run button. It is how you open the input window and trigger the test.
  • Each numbered box is a step. Inside it you read, from top to bottom: the stage number, the step name ("Pedido do Ofício", "Tipo de Ofício", "Dados da Autoridade", "Comarca do Ofício"), and the artificial intelligence model chosen to run it, with the configured reasoning level next to it.
  • The tags below each box are the inputs that step consumes. Note that step 1 consumes two (Texto_do_oficio and Tipo_do_processo) while the others consume only one.
  • The straight arrows between boxes indicate the execution order: first 1, then 2, and so on.
  • The curved arc above, labeled saida_1, is the most interesting part. It shows that the result of step 1 is being reused by step 3, skipping step 2. Without this feature, you would have to ask step 2 to repeat in its answer the data step 1 had already extracted, which would raise the cost and create more room for error.
  • The control in the bottom right corner adjusts the diagram zoom, which helps a lot in recipes with many steps.

The screen itself summarizes this reading in its legend: a straight arrow means flow order, and a named arc means information reused between stages. To the left and right of the steps sit the Input box, which gathers everything you provide, and the Output box, which is the text produced by the last step.

Why the model changes from step to step
In the example image, each stage uses a different model. That is deliberate, not sloppiness: a simple classification stage can run on a fast, cheap model, while reading a complex document deserves a stronger one. You pay more only where it actually matters.

Creating and editing steps

There are three ways to add a stage:

  1. Add step, which creates the stage at the end of the flow.
  2. Click the space between two steps, which inserts a stage in the middle. The following stages are renumbered automatically.
  3. Use the empty-screen shortcut. When the recipe has no stages yet, the Your flow has no steps yet invitation appears with the Add first step button.

Clicking an existing step opens a quick preview. In it you can already change the stage name, the model, the inputs, and the instruction without leaving the diagram. For the full version there is the Edit step screen, split into four numbered parts, deliberately in the order in which it makes sense to think:

Part What it is for
1. Step name A short title describing the action, such as "Extract tax ID" or "Classify subject". This name appears in the diagram, in the history, and in evaluation reports. Clear names save a lot of time later.
2. AI model Which model runs this stage. Each step can use a different model. If you do not set one, the recipe's default model applies.
3. Inputs for this step The list of what this stage needs to receive in order to work. This is where the flow chaining is defined.
4. Instruction for the AI The text describing what should be done with the inputs. It is the heart of the step.

Once saved, you return to the flow. To remove the stage, use Delete step, which asks for confirmation.

Inputs and chaining

Each input of a step has three definitions: name, type, and source.

Name

A short identifier using letters, numbers, and underscores. No spaces and no accents. Examples: oficio, cpf, imagem_frente, texto_do_email. This name is what you use inside the instruction, between double braces: if the input is called oficio, in the instruction you write {{oficio}}.

Type

  • Text: any written content, from a single word to several pages.
  • Image: an image file, such as a photo or a scan of a document. In this case it is important that the model chosen in the step is able to interpret images.

Source: where this content comes from

Here lies the most powerful part of the module. The source answers the question "where does this content come from?", and it has three possible answers:

Source Meaning and when to use
You provide it at run time It is an external input. Whoever runs the recipe must supply the value. Every external input automatically joins the recipe contract, that is, the list of what must be provided.
Result of the previous step The content is the output of the immediately preceding stage. Useful in linear flows: extract, then validate, then format.
Result of step number N The content comes from a specific stage, which may be several positions back. This is exactly what produces the curved arc in the diagram shown above.

In addition, each input can be marked as required or not. Required inputs left empty stop the execution with a message listing exactly what was missing.

Why the source matters so much

Without the concept of source, a multi-stage flow would be just a sequence of independent instructions. With it, you build composite reasoning. Look at the concrete court order case from the image:

  • Step 1 receives the letter text (external input) and extracts the raw data.
  • Step 2 receives the result of step 1 and classifies the type of letter.
  • Step 3 receives the result of step 1 (not of step 2) to identify the authority. That jump is what draws the arc.

Writing the instruction

The instruction is a plain-language text saying what the artificial intelligence should do. Below the text field, tags appear with the name of each input of the step. Clicking a tag inserts the name at the cursor position, already in the correct double-brace format.

A well-written instruction usually has four blocks:

  1. Role and objective. One sentence saying what the artificial intelligence is in that context.
  2. Required answer format. Described explicitly.
  3. Rules and exception cases. Numbered, short, and direct.
  4. The content itself, inserted through the variable.

Example, in the style of the ready-made extraction template that ships with the product:

You are an information extractor for automation.
Read the INPUT and answer ONLY in the format:
field_name = value

Rules:
1. One field per line.
2. No markdown, no JSON, no explanation.
3. If there is no data, use exactly: (not_found)

Desired fields: name, document, date

INPUT:
{{insumo}}

ANSWER:

Note three deliberate decisions in that text. The word "ONLY" blocks extra commentary. Rule 3 defines the behavior when the data does not exist, which is the main cause of invented information. And the "ANSWER:" marker at the end signals where the output begins, which reduces format variation.

"Input outside the prompt" warning
If you declare an input in the step but do not use its name inside the instruction text, Curator flags the stage in the diagram with this warning. It is almost always an oversight: the input exists, the value is collected, but it never reaches the artificial intelligence because there is no matching {{name}} in the text.

Prompt lab: writing the instruction with AI help

Writing a good instruction from scratch is the hardest part for beginners. That is why the Prompt lab exists, reachable through the Write with AI button in the step editor.

It works like a short interview. The artificial intelligence reads the stage context and asks objective questions about what you want: output format, desired fields, and what to do in doubtful cases. When it understands enough, it generates the complete instruction and places it in the field.

Two safeguards make this safe to use:

  • Before replacing existing text, Curator asks for confirmation.
  • There are Undo, Redo, and Revert buttons, so you can go back to the previous text if you do not like the result.

To use the lab, the stage must have an artificial intelligence model selected.

Offline answer: testing the path without spending

Each step has an optional answer field, described on screen as an offline reference answer. It stores a fixed text that will be used in the test if the model is unavailable. This lets you simulate the whole flow without spending artificial intelligence calls, typically while you are designing the chaining between stages and want to see the path of the information before paying for real executions.

Testing and reading the result

Execution starts at the run button on the flow diagram. It opens the Recipe input window, titled What goes into this recipe. In this window you do two things at once:

  • Declare which inputs the recipe requires, giving each one a name and a type.
  • Fill in an example value for each input, to be used in the test. For text, you paste the content. For images, you pick the file.

The Save inputs button stores the input list in the recipe, defining it as a permanent contract. The Run in flow button executes the test immediately with the filled values. Example values are kept, so the next time you open the window they will already be there, which makes the adjust-and-retest cycle very fast.

This input list is the recipe contract. It tells anyone who uses the interpreter later exactly what information must be provided.

Following along in the diagram

During execution, the flow diagram animates. Each box goes through visible states:

  • Processing while the stage is being executed.
  • Completed when the stage finished successfully.
  • Failed when that stage produced an error.

Once the run finishes, each step displays a small box with its own result. Clicking it shows the complete text produced by that stage.

Why this changes troubleshooting
Instead of looking only at the final answer and guessing what went wrong, you walk through the reasoning stage by stage and pinpoint exactly where the information was lost or distorted. Every test executed is automatically recorded in the history.

Monitoring requests, consumption, and cost

In the recipe list there is a Monitor button, which opens the Monitor requests screen. It gathers the execution history of your account, regardless of whether runs were triggered by the flow test, the input window, the AI Chat, or a Curator automation.

Column What it shows
Date When the execution happened.
Status Success, Failure, or Running.
Interpreter Which recipe ran.
Tokens The volume of text processed by the artificial intelligence.
Cost The estimated value of the call.
Summary A preview of what went in and what came out.

There is a search field that looks simultaneously in inputs, outputs, interpreter names, and error messages. In the footer, Curator totals the number of runs, interpretations, tokens, and cost for the listed period.

The detail of one execution

Opening a row, you see the complete record:

  • Run input: the exact values that were provided.
  • Output: the final result produced.
  • Prompt sent: the instruction with variables already substituted, exactly as the artificial intelligence received it. This is the most valuable field for troubleshooting.
  • Interpretation steps: a clickable trail with the result of each stage, the model used, and that stage's tokens and cost.
  • Error, when present, with the original message.
  • Variables and the list of missing items, when execution stopped due to a missing required input.

The history can be cleared, either one run at a time or entirely. Both actions ask for confirmation, because they are permanent.

Understanding tokens and cost

Artificial intelligence models charge by the amount of text processed, measured in tokens. Put simply, a token is a piece of a word, and a text usually consumes around one and a half tokens per word.

Curator records three numbers for each execution: input tokens, output tokens, and total. From these, it estimates the cost in dollars.

The cost is an estimate, not an invoice
The value is calculated from the processed volume and the model's price table. It serves to compare alternatives and project scale. Real billing happens directly with the artificial intelligence provider, using your own access key: Curator does not intermediate that consumption. In practice, this number answers the question that always comes up before putting a recipe into production, which is how much it will cost to run it ten thousand times a month.

Benchmark: measuring quality

Testing one case at a time answers whether the recipe works. It does not answer whether it works well. That is what the Benchmark is for: a dedicated module that runs a set of cases and calculates an accuracy score.

The summary below covers the essentials. The module has its own page with the full detail: batch building, case spreadsheet, execution across several models, reading the metrics, and the Excel report. See Benchmarks.

What a batch is

A batch is a set of test cases tied to an interpreter. Each case has the input values and, optionally, the expected result of each step, called the reference answer. Creation is guided by a four-stage wizard:

  1. Batch name. How you will identify this evaluation.
  2. Evaluation method. Automatic, comparing the answer with the reference, or manual review, with a person judging case by case.
  3. Which instructions to use. The recipe's current instructions, which change when you edit them, or a snapshot frozen at the moment the batch was created. Freezing is useful when you want to compare instruction versions over time.
  4. Evaluation base. The cases themselves.

Building the cases from a spreadsheet

The most practical way to feed a batch is with a spreadsheet. Curator itself generates an Excel template already containing the right columns for that interpreter: one column identifying the case, one column per declared input, and one reference-answer column per step.

You fill the rows with real cases and import them back. During import, the mapping screen shows which columns of your spreadsheet correspond to which fields, with a preview before confirming. Curator warns about problems before creating the batch, such as cases missing a required input or empty reference cells, explaining the effect of each situation on the final score.

Running and following along

When starting, you choose which artificial intelligence models the batch will run on. It can be a single model or several at the same time.

The live execution screen shows the case being processed, the input used, the current step, and a log of the stages already completed. You can pause, resume, or stop a specific model without affecting the others, and even add a new model to a job that is already running. Processing continues in the background if you navigate to another screen.

Reading the result

At the end, the batch presents the accuracy: the percentage of correct steps over the total evaluated. In automatic mode, comparison with the reference already produces a preliminary result, and human validation is optional.

In the review, each case is presented side by side, with Expected on one side and Obtained on the other, plus the exact instruction sent. You mark each result as right or wrong, and when marking it wrong you must write the reason.

Why the reason is required
It is not bureaucracy. The list of reasons is what turns a score into an action plan: when you read ten similar justifications, it becomes obvious which rule is missing from the instruction.

Comparing models

When the batch runs on several models, Curator builds a ranking ordered by accuracy, then cost, then duration. Besides the table, there are accuracy, cost, and speed charts side by side.

The ranking automatically highlights three different winners: best accuracy, lowest cost, and fastest. It is rarely the same model in all three, and that is precisely the decision you need to make consciously.

The result can be exported to Excel, with a summary, the ranking, and the expected-versus-obtained detail for each step. This file works well as sign-off evidence for the business area.

Where interpreters fit inside Curator

The module does not live in isolation. A finished recipe can be used in three places:

Where How it works
In the Interpreters module This is where you create, test, and maintain the recipe. It is also where anyone on the team can run a one-off case, with no automation required.
In the AI Chat You can ask Curator's assistant to list your recipes, create a new one, adjust a step, or run an existing recipe with a text you provided in the conversation. You can also mention a recipe directly in the chat to bring its content in as context.
In Curator automations An automation project can be linked to an interpreter. In that case the robot handles the mechanical part (open the system, navigate, fill in, save) and delegates the understanding part to the interpreter. The link is made on the agent building screen, by choosing the recipe and indicating where each input comes from.
The combination that delivers the most value
In high-volume operations, the three modules work together: the queue moves the work, the Performer performs the clicks, and the interpreter understands the content. Each piece does only what it does well.

AI models, keys, and availability

The access keys for artificial intelligence providers are yours and are configured in Curator's Settings, on your own machine. If a provider's key is missing, the step that uses that model fails with a clear message asking for the configuration.

Validations and messages you will encounter

Curator blocks some situations when saving or running. All of them have a direct cause and a simple fix:

Situation Cause and fix
Saving a step with no instruction The instruction text is mandatory. Write the instruction before saving.
Invalid input name Names accept only letters, numbers, and underscores, with no spaces and no accents.
Running without filling in example values Execution is blocked, asking you to fill in the Input values.
Saving an empty input list At least one named input must be registered.
Required inputs missing during execution The message lists exactly which names were missing.
Step waiting on a stage that produced no output The message indicates the step and the dependency left without a value. Check the source configured on the input.
Access key not configured or rejected That model's provider has no key registered, or the key is incorrect or expired. Fix it in Settings.
Call limit reached The provider temporarily refused due to volume. Just wait and retry.
Timeout or network failure The call took too long or there was no connection. It usually indicates a very large input or provider instability.
Interpreter with no interpretations The recipe has no steps created.

Best practices

  • Give recipes business names. "Customer complaint triage" is far better than "Interpreter 2". The name is what the whole team will see.
  • Name inputs after the role they play. texto_do_oficio is better than input1, because the instruction stays readable.
  • One step, one task. If an instruction is asking for three different things, it is probably three steps. Flows with short stages make fewer mistakes and are much easier to fix.
  • Start linear. Build the simplest flow that solves the case first. Only add cross-chaining when there is a real need.
  • Ask for the exact answer format. Say explicitly "answer with a single word only" or "one field per line, no explanation". Artificial intelligence models tend to be conversational when not restrained.
  • Define what to do when the data does not exist. Instruct a fixed value such as (not_found). Without it, the artificial intelligence tends to invent a plausible value.
  • Test with real, ugly cases. The pretty document always works. Test with the crooked scan, the truncated text, the atypical case.
  • Rewrite the instruction when it fails; do not switch models first. In most cases the problem is an ambiguous instruction, not the model's capability.
  • Freeze instructions when you want to compare versions. It is the only way to know whether the change you made improved or worsened the result.
  • Review cost before scaling. A recipe that runs ten times a day has irrelevant cost. The same recipe running ten thousand times deserves a more careful model choice.

Common mistakes

  • Creating the input and forgetting to use it in the instruction. If the variable does not appear between double braces in the text, that content simply never reaches the artificial intelligence. Curator warns with the "Input outside the prompt" alert.
  • Chaining a step to the result of a stage that has not run yet. The "result of step N" source can only point to an earlier step.
  • Writing an instruction that asks for three tasks at once. The answer becomes a mixture that is hard to verify and to fix.
  • Treating the result as correct without measuring. A recipe that looks good in three tests may be right only 60% of the time across a hundred cases. That is exactly what the Benchmark is for.
  • Building a batch with perfect documents only. It produces a pretty, useless score. Include the hard cases on purpose.
  • Choosing a model by score alone. A two-point accuracy gain rarely justifies a fivefold increase in cost per execution. Look at cost and speed alongside the score.
  • Putting sensitive data in a test value and leaving it there. Example values are stored in the recipe and appear in the history.