


AI Chat (Agent)

image
image
image
Version: 2.1.9
© 2025 PYE Tech. All rights reserved.

AI Chat (Agent)

This page is the manual for Curator's AI Chat, written for people who will use it daily without needing to know how to program. You can read it end to end the first time and later come back only to the section you need. Whenever a technical term appears, it is explained right there. Names in quotes are exactly the texts shown on Curator's screen, so it is worth opening the program and following along.

What the AI Chat is and where to find it

The AI Chat is a written conversation, in plain language, with an artificial intelligence assistant that builds and fixes your automation robots. You describe what you want; it reads the robot's files, writes the code, shows what changed, and waits for your approval.

Before moving on, two terms that will keep coming up:

  • Automation (or "robot", or "agent"): a small program that performs a repetitive task on its own — opening a website, downloading an invoice, typing data into a system, reading a PDF and filling in a spreadsheet.
  • Project: the set of files of a specific robot. The AI Chat always works inside a project, never "in general".

You find the feature in Curator's side menu, under "Agent (AI Chat)".

The entry rule: a project must be open

This is the first thing that confuses newcomers. The chat does not work in a vacuum: it needs to know which robot it will touch. If no project is open, you will see this screen:
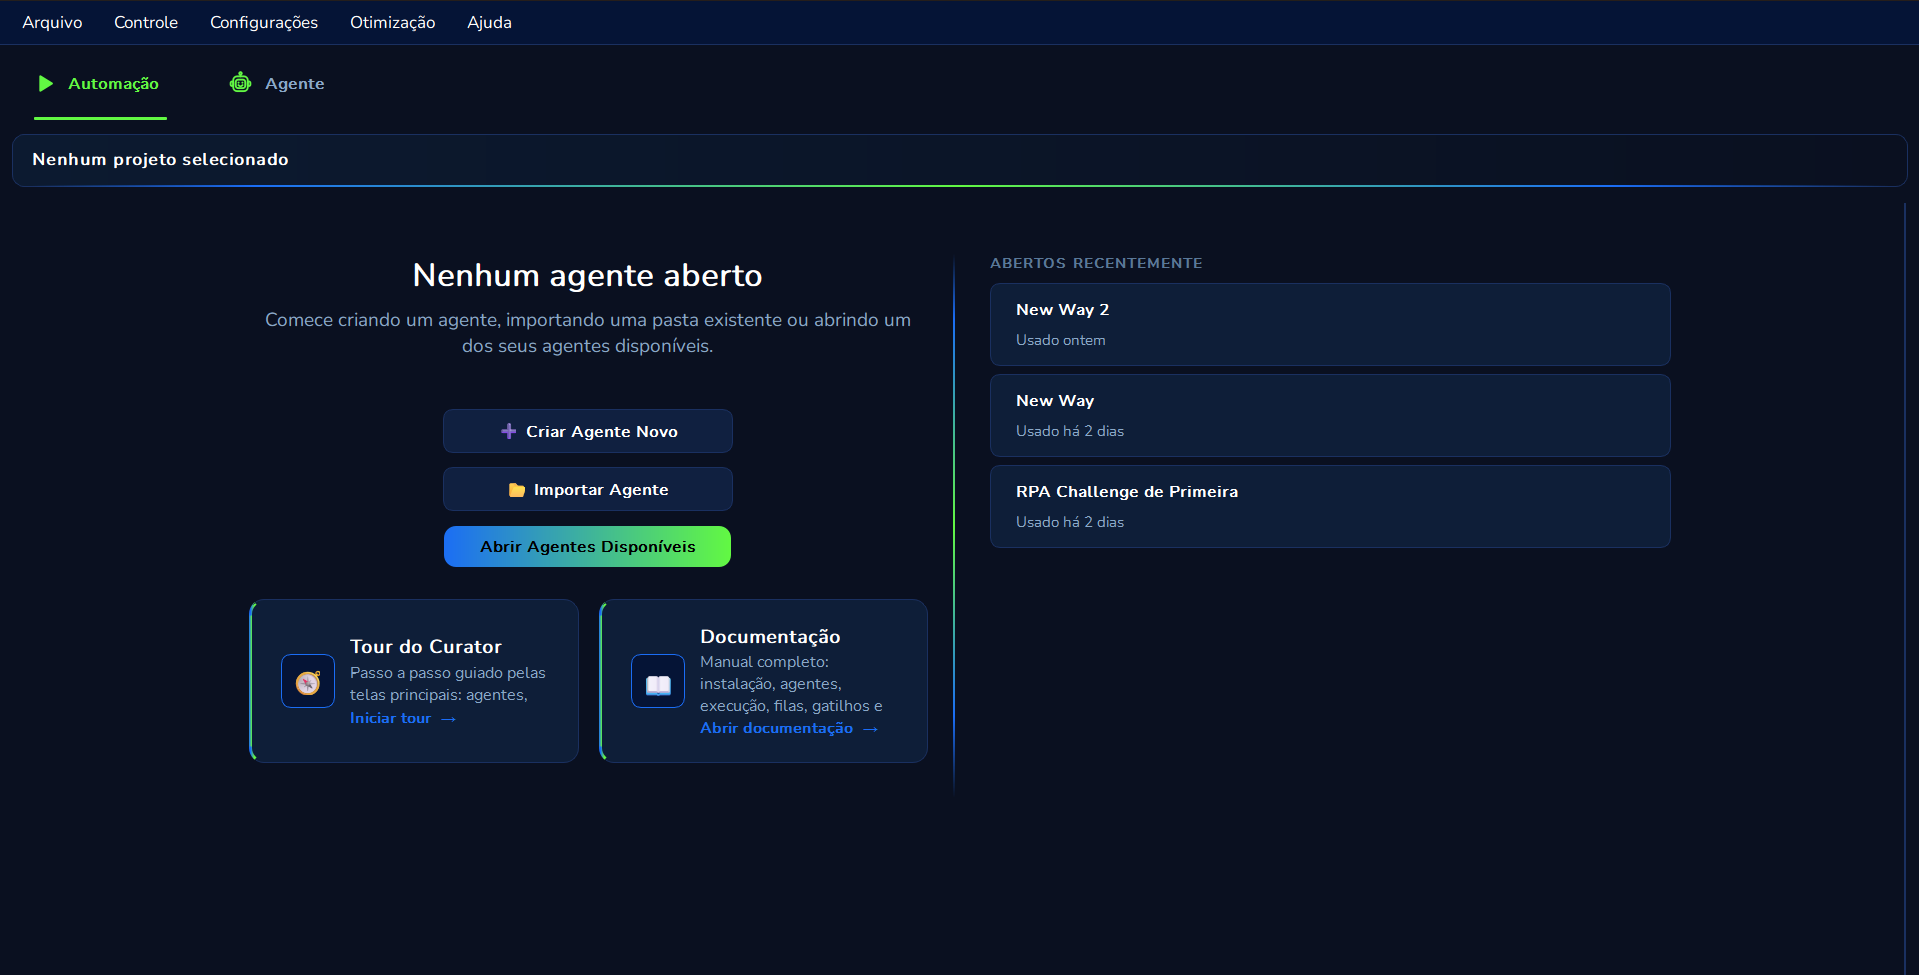
Curator screen with no agent open, showing buttons to create, import and open agents

Note three things in the image. At the top, the band warns "No project selected". In the center, the title "No agent open" explains that you must start by creating an agent, importing an existing folder, or opening one of the available agents. On the right, the "RECENTLY OPENED" column lists the last robots you worked on, with the date of use, so you can get back to work in one click.

Button What it does
"Create New Agent" Starts a robot from scratch.
"Import Agent" Brings in a project folder that already exists on your computer.
"Open Available Agents" Shows the list of existing robots for you to choose one.

While there is no project, the writing field stays disabled, showing "Open a project in Automation to use the chat…", and the footer warns "Chat blocked — select a project in Automation."

How to know which robot the AI is working on
With a project open, a band appears at the top of the conversation with the "PROJECT OPEN" label and the robot's name, plus a "View in Automation" link to switch projects. Always check this band before requesting a change. It is the difference between changing the right robot and changing the wrong one.

The other block: robot running

If the robot is running at that moment, the chat is temporarily disabled with the message "AI Chat disabled — the robot is running."

The reason is simple and protective: if the artificial intelligence changed the files while the robot was using them, the execution could break midway. Wait for the run to finish and the chat comes back on its own.

The chat screen, part by part

The screen has three regions: the conversation list on the left, the conversation itself in the middle, and the writing field with its controls at the bottom.

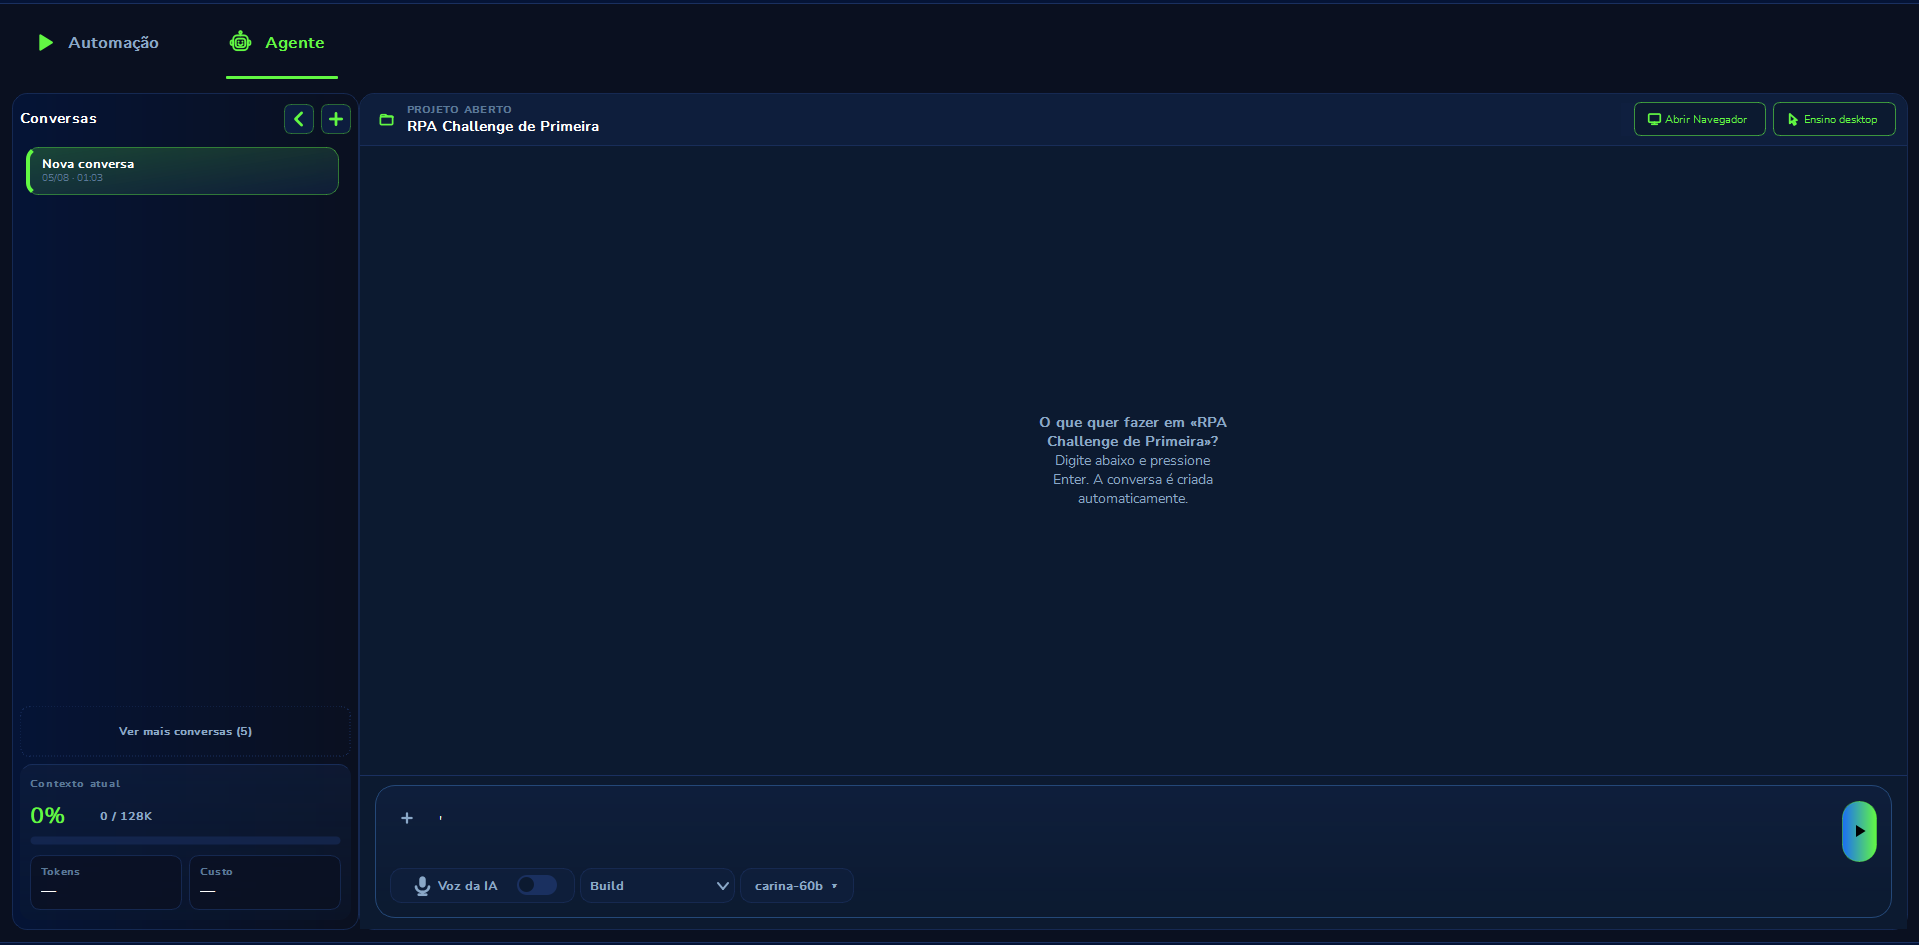
Full AI Chat screen in Curator, with the conversation column, the conversation area and the writing field

Walking through the image: on the left, the "Conversations" column with the current conversation selected and the "See more conversations" link at the end of the list. At the foot of that column are the conversation's numbers — "Current context" with its usage bar and the "Tokens" and "Cost" cards. At the top of the middle area, the "PROJECT OPEN" band with the robot's name, and in the top right corner the two teaching buttons, "Open Browser" and "Desktop teaching". In the center, the empty-state question. Below, the writing field and, in the footer, the "AI Voice" toggle, the mode selector (here on Build) and the model selector.

The conversation column

At the top, the title "Conversations" and two small buttons: one to hide the column ("Hide conversations", which becomes "Show conversations") and one to create ("New conversation").

Each row is a conversation, with a title generated automatically from the subject. A newly created conversation shows as "New conversation"; a conversation the artificial intelligence is currently working on shows as "Working…". If there are many, the end of the list offers "See more conversations" with the count in parentheses. To delete, use "Delete conversation": Curator asks for confirmation and warns that the action cannot be undone.

The conversation area and the progress messages

When the conversation is empty, Curator asks "What do you want to do in this project?" — or, with the robot already chosen, "What do you want to do in «name»?" — and instructs: "Type below and press Enter. The conversation is created automatically." In other words, you do not need to create the conversation before writing.

While working, the artificial intelligence shows which phase it is in. These messages are not decoration: they literally say what is happening.

Message on screen What is happening
"Thinking…" The artificial intelligence is reasoning, without touching anything yet.
"Reading files…" It is opening your robot's files to understand the code.
"Preparing code changes…" It is writing the changes.
"Applying approved changes…" It is writing to disk what you approved.
"Validating the automation…" It is checking whether the result works.
"Waiting for you…" It stopped and needs your answer or approval.
"Processing your answer…" It received your answer and went back to work.
"Could not complete." An error occurred. See the common problems section.
"Reasoning interrupted." You clicked stop.

At the end, "Worked for" appears with the time spent, useful to get a sense of how much a task costs in minutes.

The writing field and its controls

On the text line, from left to right:

  1. "+" button — attach files. The tooltip explains: "Attach Excel, PDF or image · Ctrl+V pastes a photo from the clipboard". Each attachment appears as a tag, with an "x" to remove it.
  2. Message field — with the instruction "Ask to create or change an automation… Use @ to mention files". The @ symbol opens a list of project files: use it when you want to point exactly where to work, instead of describing it in words.
  3. Send button — tooltip "Send · Enter". While the artificial intelligence works, this same button becomes "Stop reasoning · Esc".

Right below, the control footer holds the "AI Voice" toggle, the mode selector (the most important control on screen, the subject of the next section), the model selector, and the status bar, where the progress messages from the table above appear.

The floating buttons

Some buttons only appear when they make sense:

Button When it appears What it is for
"Changes" When the AI touched files See what changed.
"Undo" / "Redo" After changes Undo or redo.
"Open Browser" Always, with a project open Teach a website to the AI.
"Desktop teaching" Always, with a project open Teach a Windows program.
"Continue in Curator" Only in old conversations Migrate a conversation created in a previous version.

The two teaching buttons work as toggles: clicking again collapses the panel. And they do not coexist — opening one collapses the other.

The three modes: Build, Plan and Chat

This is the most important section on the page. The mode defines what the artificial intelligence is allowed to do in your robot. Choosing the wrong mode is the number one cause of frustration — both of "the AI did nothing" and of "the AI changed things I did not want". Think of the mode as an access badge: the same assistant, with different authorizations.

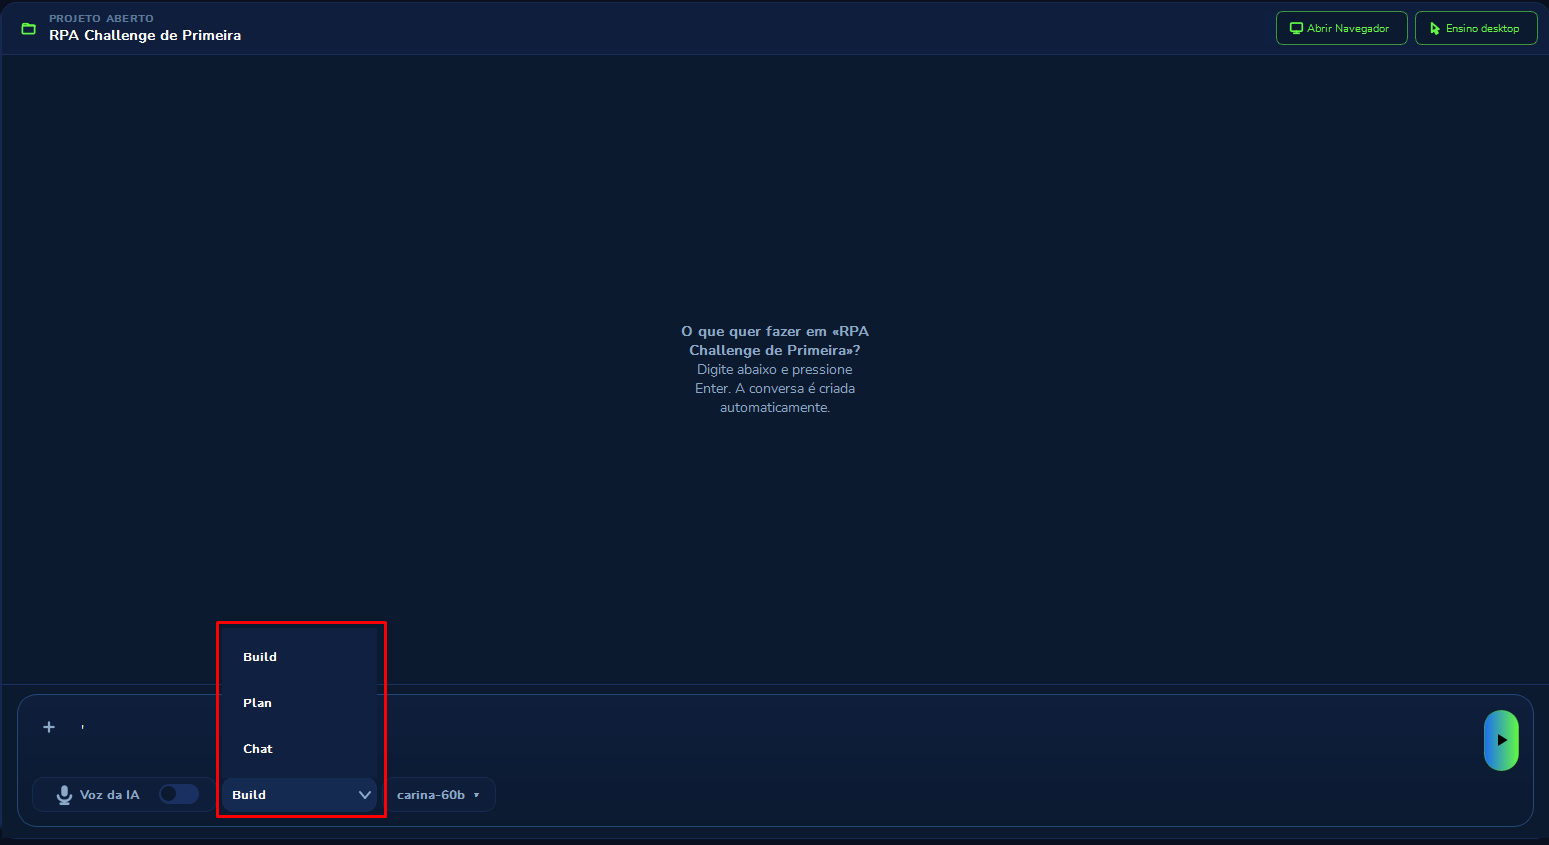
Mode selector open in the AI Chat, showing the Build, Plan and Chat options

The selector sits in the footer, next to the voice toggle, and the tooltip sums everything up in one line: "Curator · Build edits; Plan only researches; Chat only talks."

Build

The artificial intelligence reads the robot's files and changes the code. It can read, search text, edit existing files, create new files, and use the other functions listed further on.

When to use it: when you already know what you want and want it done. For example: "add a tax ID field to the output spreadsheet" or "fix the error that appears when the site is slow to load".

This is the only mode that touches your code. Every change is visible in the "Changes" button and can be undone with "Undo" — but the healthy habit is to check before moving on.

Plan

The artificial intelligence researches, understands the project, and writes a plan of how to do it. It is prevented from changing your robot's code.

It is worth understanding why this block is trustworthy: it is not the artificial intelligence "promising" not to touch anything. It is a real permission lock, applied from outside it. In Plan mode, write and edit authorizations are denied for project files and allowed only for plan files. If the AI tries to edit the code, the system itself refuses.

When to use it:

  • The task is large and you want to agree on the approach before spending time.
  • There is more than one way to solve it and you want to compare.
  • You do not know the robot well and want the AI to explain what exists today.

How to leave Plan: you read the plan and answer something like "go ahead", "start", or "yes". Curator understands that as your green light. From then on, with the mode set to Build, the AI executes the agreed plan.

Chat

Just conversation. The artificial intelligence answers in text and does not open or change any file. Use it for conceptual questions ("what is the difference between a queue and a trigger?"), for explanations, or to decide the path before involving the code.

The hidden advantage: because it does not read files, it is the fastest and cheapest mode. For a simple question, it makes no sense to pay for a full read of the project.

Quick comparison

Build Plan Chat
Reads the robot's files Yes Yes No
Changes the robot's code Yes No No
Writes a plan Yes Yes No
Cost and time Highest Medium Lowest
Typical use Execute Agree Ask

The recommended flow

For any task that is not trivial, this is the safest path:

1. Conceptual question ....... Chat mode   (ask)
2. Request a plan ............ Plan mode   (agree)
3. You read the plan
      "not what I meant" --> back to step 2
      "go ahead"         --> move to step 4
4. Execute ................... Build mode  (do it)
5. Check the "Changes" button
      "came out wrong"   --> "Undo" and back to step 2
      "looks good"       --> test the robot

In short: ask in Chat, agree in Plan, execute in Build, check in Changes. If something came out differently than expected, undoing and starting over costs less than patching on top of the mistake.

The fourth behavior: "Batch Cognition"
There is a fourth behavior that does not live in the mode selector. You reach it through the Interpreters module in the side menu, whose panel is called "Batch Cognition". It is a specialization of Build aimed at a specific problem: extracting information from texts and documents. Through the chat, the AI can list, create, adjust, and even run an interpreter so you can check the result. The full detail is on the Interpreters page.

Viewing, approving and undoing what the AI did

This section exists for one reason: you never have to trust the artificial intelligence blindly. Curator has three layers of control — view, approve, and undo.

View: the "Changes" button

Whenever the AI touches files, the "Changes" button appears, with the number of files in parentheses when there is more than one. Inside each AI message there is also a "View changes" link, which opens the proposed changes window for that file, with three ways of looking:

Tab What it shows
"Full diff" Side by side, what came out and what went in — the removed and added lines.
"Proposed code" How the file will look.
"Previous code" How the file looked before.

"Diff" is simply the industry word for the list of differences between the old and the new version. It is the tab where reading is fastest, because it shows only what changed, not the whole file. If there was no real textual difference, "No textual difference." appears.

Approve: the "Important action" card

Certain actions are not executed without your explicit authorization. In those cases a card appears with the title "Important action", the state "Awaiting decision", and two buttons: "Approve" and "Refuse". After you decide, the card shows "Approved" or "Refused", remaining as a record in the conversation. When the action involves too many files or elements to list, the card summarizes with "… and N more file(s)".

There is also a different card: "The AI needs an answer". It appears when the artificial intelligence found an ambiguity and prefers to ask instead of guessing. It offers ready-made options, plus the "Other answer" alternative, where you write freely. This behavior is intentional: one extra question is better than one wrong change.

Undo: "Undo" and "Redo"

Before each of your requests, Curator takes a snapshot of the robot's files. That is what we call a return point: a portrait of how everything looked before that message. It happens automatically, without you asking. With that, you get two buttons:

Button What it does
"Undo" Undoes the agent's changes since your last message.
"Redo" Restores the changes that were undone — that is, the undo of the undo.

You are also not limited to undoing the last step. Hovering over any message of yours in the conversation reveals a button to return the code to the state before that message, undoing whatever the agent did afterwards. This is very useful when a conversation has gone off the rails: instead of trying to fix five wrong changes stacked on each other, you go back to the point where things were still right and rephrase the request.

The honest limit of undo
This return covers the robot's files and the conversation. It does not undo effects that left your computer — for example, an item already written to a queue in the cloud, or an email already sent by a test run. That is why those actions go through the "Important action" card before happening.

The built-in browser (Open Browser)

Imagine explaining in writing to another person, over the phone, exactly which button to click on a website full of similar fields. It is hard, slow, and error-prone. The same happens with artificial intelligence.

The "Open Browser" button solves this by inverting the logic: instead of describing, you demonstrate. You open the site, perform the process with the mouse, and Curator notes the technical path of each field and button to hand over to the AI.

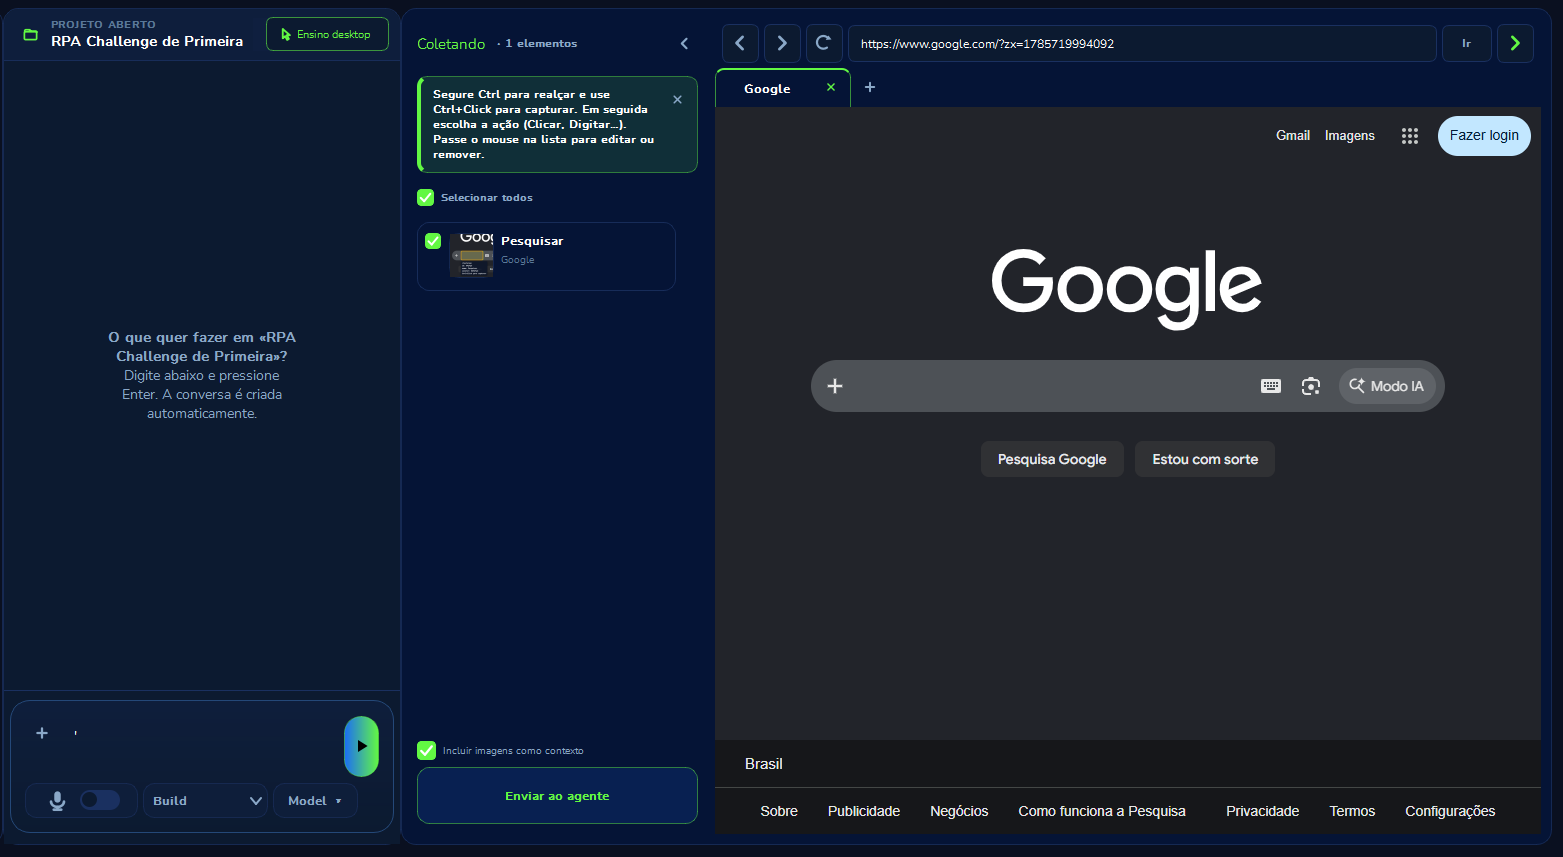
Curator's built-in browser open with the element collector active and one captured element

The screen splits into three: the collapsed chat on the left, the collector column in the middle, and the browser on the right. In the middle column you read "Collecting · 1 elements", the capture gesture tip, the "Select all" checkbox, and the already captured element — here the "Search" field of the Google page, with a thumbnail of that screen region. At the foot of the column sit the "Include images as context" checkbox and the "Send to agent" button. The browser on the right has its own bar with back, forward, reload, the address field, the "Go" button, and the tabs.

It is not your Chrome
This browser lives inside Curator. It is not the Chrome window you use daily, and it does not share your tabs or your saved passwords. It exists for one purpose: recording the demonstration. Later, when the real robot runs in production, it uses the Chrome installed on the machine. The built-in browser is the classroom, not the workplace.

The two ways of teaching

The built-in browser works in two complementary ways.

Way 1 — Record the path (teaching mode). The on-screen tip is "Teaching mode: navigate and interact — actions will be recorded." You simply perform the process: open the site, click, type, change pages. Curator records the sequence and the panel shows "Recording · N actions". To hand it to the AI, click "Attach teaching": the lesson enters as an attachment in the writing field and you can still write text alongside it before sending — for example, "do this, but for every client in the spreadsheet".

Way 2 — Capture the elements (Collector mode). The "Collector" button turns on a more precise mode, with the gesture described in the tip: "Hold Ctrl to highlight and use Ctrl+Click to capture. Then choose the action (Click, Type…). Hover over the list to edit or remove."

Two terms are worth translating here:

  • Element: anything clickable or fillable on the page — a button, a text field, a list, a checkbox.
  • Selector: the technical "address" of that element inside the page. It is how the robot finds the right field even after the page reloads. "CSS" and "XPath" are just two different formats for writing that address — you do not need to understand either one, Curator chooses.

Saying what to do with each element

As soon as you capture an element, a small menu opens with the title "Element: name" and the question "What do you want to do with this element?". The options:

Option Meaning
"Click" Just click it.
"Type" Write text into it.
"Collect text" Read what is written there and store it.
"Select from list" Choose an option from a dropdown list.
"Check/uncheck" Turn a checkbox on or off.
"Other" Anything else — here you must describe the action.

There is also an annotation field: "Optional context (e.g. type the search term)". It is well worth using. "Type" states the gesture; the annotation states the why, and that is what helps the AI write code that makes sense.

Checking and editing the selector

Each captured element becomes an item in the column, and hovering reveals four controls: the checkbox (to include this element in the context sent to the agent), Test, Edit, and Remove.

The Test button deserves attention, because it is what prevents rework. When clicked, Curator looks for the element in the open tabs and shows one of three results: "Unique selector found (green highlight)", which is ideal; "Selector in more than one place", with all of them highlighted in yellow, a warning that the robot may click the wrong spot; or "Selector not found in any open tab", in which case it is worth capturing again.

When the test flags ambiguity, the path is Edit. That is when the "Edit Selector" window opens:

Curator's Edit Selector window, with the list of recommended candidates and their stability scores

This window is where Curator opens up about how it finds an element, and it is worth reading carefully. On the left, the "RECOMMENDED CANDIDATES" list: each row is a different way of addressing the same element, with a score from 0 to 100 beside it. In the image the scores are 95, 94, 88, and 76 — the higher, the more reliable.

The colored badges on each candidate say why it got that score. They report the type of address used (the field identifier, the element's role on the page, the name, or the visible text) and its quality: "stable" means the address tends to keep working when the page changes, "moderate" means it is more fragile, and "unique" confirms it finds only one element on the page, which is exactly what you want.

On the right sit two visual confirmations. On top, the "ELEMENT" block with the element name and the capture with it highlighted, so you can confirm it really is that field. Below, the "CHOSEN SELECTOR" block shows the address that will be handed to the agent. The instruction there explains a useful detail: you can stack several candidates, and the first in the list is the primary one — the others serve as backups if it fails.

You do not need to understand the technical text of the candidates to use this window. Just pick the one with the highest score and the "stable" and "unique" badges, check the thumbnail on the right, and save. The scores exist precisely so that you do not have to judge code.

Sending to the AI

Before sending, decide on the "Include images as context" checkbox: when checked, each capture with the element highlighted is attached to the chat as visual context. It is worth checking when the screen is confusing and the image clarifies it. There is a cost: the image consumes more conversation space and only works with models that accept images, those marked "Img" in the model selector.

Then click "Send to agent". Curator generates a dossier — an organized document with the names and addresses of each marked element — and attaches it to the chat for you to send. If no element is marked, the warning is "Mark at least one element (checkbox) to send to the agent."

Test in the browser: watching the robot rehearse

After writing the code, the AI may propose a rehearsal. An approval card appears with the "Test in browser" button and, inside it, four things for you to check:

  • "Test steps:" the exact list of what will be done. Read it before approving.
  • "Data to fill in the fields:" one space per field. Use fictitious data.
  • "Speed:" "Fast (0.5 s)", "Normal (1 s)", or "Slow (2 s)". The pause between steps exists so you can follow with your eyes. The first time, use "Slow".
  • "Allow submit/save in this simulation" — the most delicate option on screen.
"Submit" is the final sending of a form. Unchecked, the rehearsal fills everything in but does not confirm — nothing is written to the real system. Checked, the rehearsal really submits. The recommendation is direct: leave this box unchecked until you are absolutely sure. Checking it means touching real data, and Curator's "Undo" does not reverse that.

The honest limit: the AI does not browse on its own

This needs to be clear so as not to create the wrong expectation. The artificial intelligence does not go browsing the internet on its own. The built-in browser does two things, both started by you: it records what you do, so the AI learns the process, and it replays a list of steps that you read and approved.

There used to be a feature in which the AI looked at the screen and moved the mouse on its own. It is disabled in Curator and was replaced by the two teaching modes. The swap was deliberate: the demonstration you perform is faster, more reliable, and much safer than an AI trying to guess the interface in the dark.

Desktop teaching mode

The built-in browser handles websites. But much office work happens in programs installed on Windows: an ERP, an accounting system, an invoice issuer, a Windows window itself. The "Desktop teaching" button is the browser's sibling for those cases.

The button tooltip notes that it "does not require OpenCode", and that has an important practical meaning: "OpenCode" is the name of the engine that makes the AI work, explained in the section about the engine behind it. The tooltip is saying that the desktop teaching panel works even if that engine is unavailable. You can register the screen points and store them, and only later involve the AI.

The panel vocabulary

Desktop teaching deliberately uses everyday words instead of programming terms. It is worth knowing them, because they are the same ones the AI will use when talking to you:

Word on screen What it means
Point on screen Point with the mouse to what you want to automate.
Target A screen point already registered — a button, a field, a column.
Confirm Say "yes, that is the one" for the point Curator understood.
Highlight Make Curator light up the Target on screen, so you can check it is the right one.
Step An action on a Target: click, type, select, or read.
Record Register the sequence of Steps.
Step rehearsal Run a single Step and see whether it worked.

Note that Highlight, Confirm, and Rehearsal are three distinct things, and that distinction is useful: Highlight only lights up the point; Confirm validates that it is the right element; Rehearsal tests whether the action on it actually works.

The five-stage flow

  1. Point on screen. Click "Point on screen". Curator enters pointing mode with the tip "Ctrl highlights · Ctrl+Click captures" — deliberately the same gesture as in the browser. Keep the program visible, hold Ctrl to see elements lighting up, and Ctrl+Click the one that matters.
  2. Check what Curator understood. The captured Target appears in the evidence area with a thumbnail of that screen region and the question "is this the one you pointed at?". That question is not a formality: in Windows programs overlapping elements are common, and Curator may have caught the frame around the button instead of the button.
  3. Build the Target list. Confirmed Targets are listed, with a "Select all" checkbox to choose which ones go to the AI. Each Target has the same three controls as in the browser: Test, Edit, and Remove — and Test looks for the Target on screen and lights it up, so you can visually confirm it is still findable.
  4. Record the Steps. Registering Targets says where to click; the Steps say in what order and what. To end recording, "Stop recording".
  5. Send to the AI. With Targets and Steps ready, the material goes to the conversation: a description of the screen points and the action sequence, with the images. The AI uses that to write the robot's code.

Each Target also has a "Details" button revealing the "Primary selector" — the technical address Curator will use — and the "Candidate layers", which are the other possible addresses for the same point, kept as backups if the primary fails. You do not need to open this to use the product: it is verification information.

When to use each teaching mode

Situation Use
Website, portal, system that opens in the browser "Open Browser"
Installed ERP, .exe program, Windows window "Desktop teaching"
Process that goes through both (download from the site, post into the ERP) Both, one after the other, in the same conversation
The honest limit of desktop teaching
On a web page, Curator has access to the page's internal structure and almost always hits the right element. In an installed program, that depends on how the program was built. Well-behaved programs work as well as a website; programs that draw the screen themselves, common in older systems, may require you to point at the spot more than once.

If Curator cannot identify the point, it asks for help in plain language, without jargon — for example, asking you to point again or to prepare the screen, leaving the window visible, at the right size, and on the correct tab. It is neither your fault nor a defect: it is the product being transparent about what it managed to see.

What the AI can do in the chat

This section is the inventory of Curator's capabilities in the chat. We call these capabilities functions: concrete things the artificial intelligence executes, not just subjects it can talk about. For each function, two things matter: whether it depends on the mode and whether it asks for your approval before happening.

Working on the robot's files

Function What it does Mode
Read file Opens a project file to understand the code. Build, Plan
Search for text Finds where a word or snippet appears in the project. Build, Plan
List files Sees which files exist and how they are organized. Build, Plan
Edit file Changes a portion of an existing file. It is recorded in "Changes" and can be undone. Build only
Create file Writes a new file in the project. It is recorded in "Changes" and can be undone. Build only

Two practical notes about reading. First: the AI reads in parts, not the whole project at once — very large files are read in chunks, which is why it sometimes performs several reads in a row before answering. Second: it only reaches files inside the open project. If a request would require touching a folder outside the project, Curator refuses automatically.

Reading the documents you attach

Through the "+" button you attach material, and the AI reads the content:

Type What the AI uses
Excel (spreadsheets) The cell data, to understand the input or output format.
PDF The document text, useful for robots that extract information from invoices and contracts.
Image What is in the picture — a screen, an error, a flow drawing.
Email text The pasted content, when the process starts in a message.

You can also paste an image straight from the clipboard with Ctrl+V — very handy for sending a photo of the error message that appeared on screen. Image attachments only work in models that accept images: those showing the "Img" badge in the model selector.

Managing queues

A queue is a shared central list of work to be done. The AI operates that list straight from the chat: it can list queues, view a queue's detail, list items, view an item, create a queue, add an item, change an item's status, and postpone an item — all of that without asking approval, because these actions are reversible or only add information.

The exception is deleting an item, which always goes through the "Important action" card. The reason: deleting removes pending work permanently, and that is a loss the "Undo" button cannot recover, because the queue lives in the cloud, not in your computer's files.

Examples of requests that work: "which queues exist in this project?", "how many items have errors in the invoice queue?", "postpone to tomorrow the items that failed today".

Creating triggers

A trigger is an automatic firing rule: "run this robot every day at 7 am" or "run whenever a new item enters the queue". The AI can create that rule from what you describe in plain language.

The AI does not run your robots.
It creates, changes, and schedules. The one who tells a robot to run now is you, clicking Run in the Automation module. This is not a forgotten technical limitation — it is a security decision. A real execution touches real systems, sends data, issues documents. That trigger stays in your hands.

Narrating out loud: the "AI Voice"

The "AI Voice" toggle, in the left corner of the footer, makes the assistant narrate out loud what it is doing, in its own words:

AI Voice toggle highlighted in the footer of Curator's AI Chat

The tooltip describes the behavior: "Voice narrator: the agent tells out loud, in its own words, what it is doing in your project". While speaking, the toggle shows "Narrator speaking… click to turn off". It lets you follow along without reading the screen — useful in long tasks, when you want to do something else while Curator works.

The narrator depends on a configured OpenAI key. Without it, the warning is "Configure the OpenAI key in Settings to use the narrator" — and that applies even if you use a model from another provider in the chat. Narration consumes tokens separately from the chat tokens, so it appears added to the conversation cost.

What the AI does not do

To close the inventory honestly:

The AI does not Why
Browse the internet on its own The autonomous screen control feature is disabled; the path is teaching.
Control your mouse and keyboard freely Same reason.
Start a robot's execution Security decision — Run is yours.
Touch files outside the open project External folders are refused automatically.
Change code in Plan or Chat mode Mode permission lock.
Undo external effects that already happened "Undo" covers files and the conversation, not the cloud.

The artificial intelligence models

A model is the brain that reads your request and produces the answer. Curator has no brain of its own: it talks to models built by companies such as OpenAI, Anthropic, and Google, and handles all the organization around them — reading the files, applying changes, asking for approval, storing the conversation.

There is a choice because models differ along three axes that matter to your wallet and your clock: how accurate they are on hard tasks, how much they cost, and how fast they are. There is no "best one": there is the right one for the task at hand.

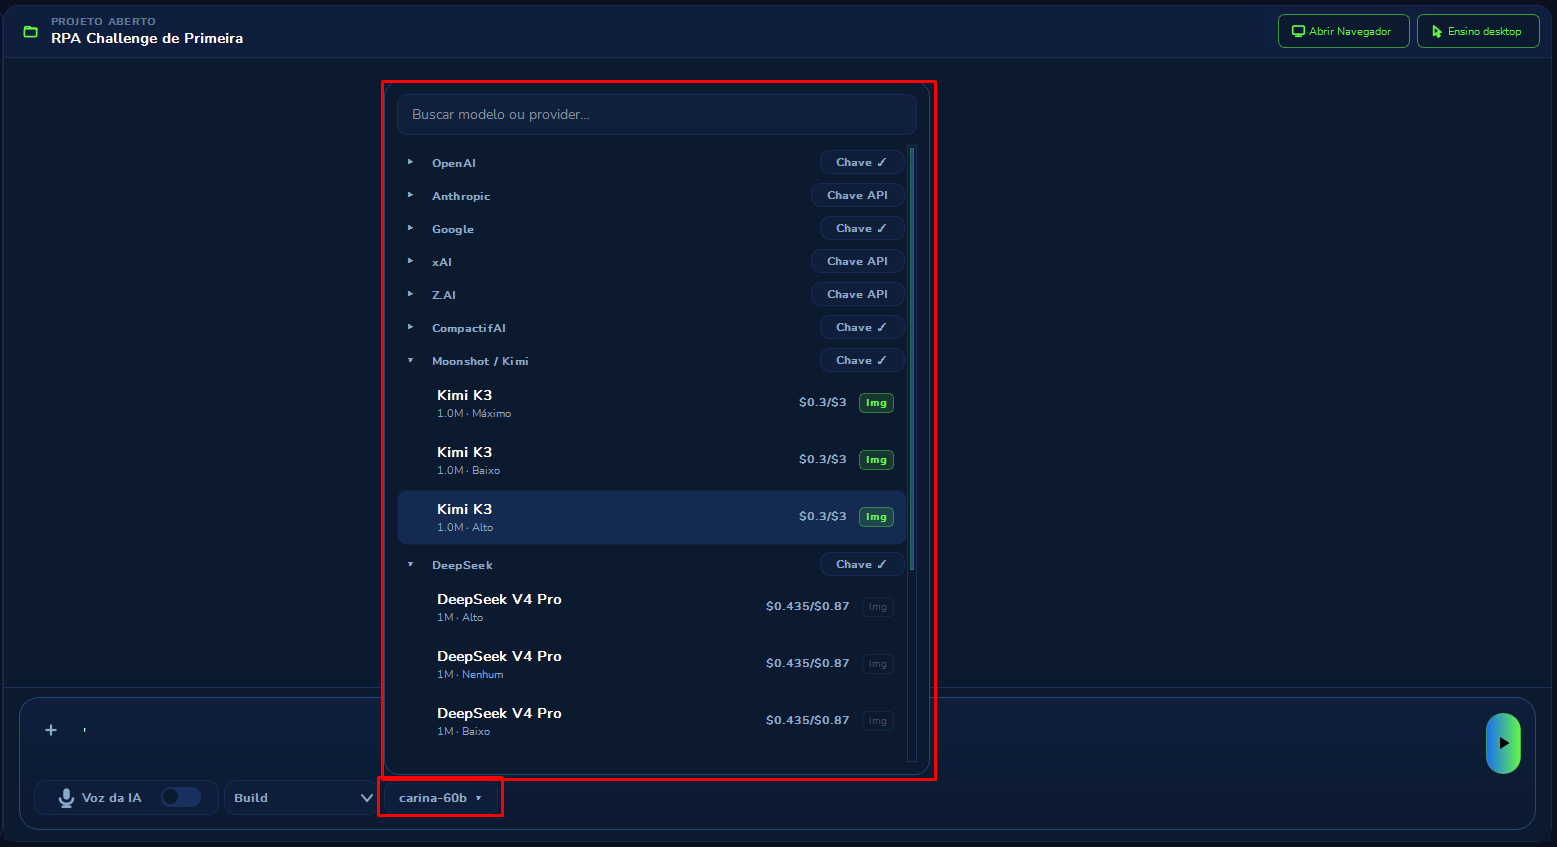
Curator's model selector open, with the provider list, key status and each provider's models

The panel opens with the "Search model or provider…" field at the top, useful when you already know the name of what you are looking for. Below comes the provider list, each one expandable to reveal its models. Note the label to the right of each provider: that is where you find out at a glance which ones are ready to use.

Access keys: why some models appear unavailable

An API key is a password identifying your account with the model's provider. Without it, the provider does not serve requests and does not know whom to charge. Curator does not embed keys: you use your own account with each provider and pay the consumption directly to them.

Indicator Meaning
"API Key" No key registered yet. Click to enter one. That provider's models stay locked.
"Key ✓" The key is configured and the models can be used.

In the image above, for example, OpenAI, Google, CompactifAI, Moonshot, and DeepSeek show "Key ✓" and can already be used, while Anthropic, xAI, and Z.AI show "API Key", still awaiting registration. After saving, the confirmation is "Key saved", with a note that it was synchronized — meaning it also becomes available on your other machines, without registering again on each one.

How to read a model's label

Each model shows three pieces of information together, separated by dots:

GPT-5.5 · 272K · Medium
   |        |       |
   |        |       +-- configured effort level
   |        +---------- working memory size (272 thousand tokens)
   +------------------- model name

In the image, Kimi K3 appears three times with "1.0M" of memory and different levels — Maximum, Low, and High — because the same model can be offered with distinct effort settings. To the right of each row are the cost, in input/output format, and the "Img" badge when the model accepts images.

Why the cost comes as two numbers
The first is what you pay for what you send to the model (input), the second for what it answers (output). Output is always more expensive than input. This explains something that seems odd at first: a short question generating a huge answer can cost more than a long question with a brief answer.

Available providers and families

"Provider" is the company that offers the model.

Provider Families in Curator General profile
OpenAI GPT-5.6 Sol, GPT-5.5, GPT-5.6 Terra, GPT-5.6 Luna General use. GPT-5.5 is the system default.
Anthropic Opus 5, Fable 5, Sonnet 5 Strong on large codebases and long reasoning.
Google Gemini 3.6 Flash, 3.5 Flash, 3.5 Flash-Lite, 3.1 Pro, 3 Flash, 3.1 Flash-Lite, 2.5 Pro, 2.5 Flash Large working memory and a good cost/speed ratio.
xAI Cursor Grok 4.5 General-purpose alternative.
Z.AI GLM 5.2 Lower-cost alternative.
CompactifAI GPT OSS 120B, GPT OSS 20B, Hypernova 60B, Carina 60B, Qwen 3.6 27B, GLM 5.1 Compressed models, focused on savings.
Moonshot AI Kimi K3 Very large working memory.
DeepSeek DeepSeek V4 Pro, DeepSeek V4 Flash Low cost with good capability.
Qwen Qwen 3.8 Max, Qwen 3.7 Plus, Qwen 3.7 Flash Low cost, fast answers.

About family names, a rule that helps you decide without memorizing anything: words like Flash, Lite, and Mini indicate faster and cheaper versions; Pro, Max, and Opus indicate more capable and more expensive ones.

The list above ships with the product. When a provider launches a new model, Curator recognizes it automatically and it starts appearing in the selector without needing a program update. One specific capability: video as an attachment only works with Google (Gemini) models. Other providers accept images, but not video.

The effort level

Some models let you adjust how much they think before answering. That is the "effort", and it appears in the label.

Level Behavior
None Answers directly, with no reasoning stage. Fastest and cheapest.
Low Thinks a little.
Medium Balanced — the default for most.
High Thinks a lot before acting.
Extra high Even longer reasoning.
Maximum The model's limit. Slowest and most expensive.

The practical rule: the higher the effort, the better the result on hard problems, and the higher the cost and the wait. For "rename this variable", None or Low effort is enough. For "find out why this robot only fails on Fridays", it is worth paying for High. Not every model offers every level, and some have a fixed level — that is not a Curator inconsistency, it is how each provider built the model.

A quick choosing guide

Situation Suggestion
I do not know what to choose Stay on the default: GPT-5.5 · Medium.
Simple question, small tweak A Flash or Lite model, Low or None effort.
Hard problem, a bug nobody can find Opus 5, GPT-5.6, or Gemini Pro, High or Maximum effort.
Large project, many files to read A model with large working memory — Fable 5, Kimi K3, Gemini, GPT-5.6 Luna.
I need to save money DeepSeek, Qwen, GLM, or the CompactifAI models.
I will attach screenshots and photos A model with the "Img" badge.
I will attach video Necessarily a Gemini.
Advice that really saves money
Switch models mid-conversation. Use a cheap model to explore and understand the problem, and an expensive one only when solving the hard part. The switch applies to the next message and erases nothing already discussed.

Context, tokens and cost

A token is a small piece of text. It is not exactly a word: a common word usually counts as one to three tokens. Everything is measured in tokens — what you write, the files the AI reads, the images you attach, and the answer it produces — and providers charge by token.

The context is everything the artificial intelligence is "holding in its head" at that moment: the conversation history, the files read, the attachments, and Curator's internal instructions.

The desk analogy
You can work with a certain number of papers open on your desk at once. Each model has a desk of a different size — the "272K" or "1M" in the label. When the desk fills up, something has to go.

And here is why that matters to you, not just to the program: the fuller the desk, the more expensive each message becomes, because the entire conversation is resent to the model with every request, and the greater the chance the AI loses details mentioned at the beginning.

Reading the "Current context" panel

At the bottom of the conversation column sits the "Current context" panel, with a bar and numbers in the "used / limit" format. In the chat screen image earlier on this page, it appears as "0% — 0 / 128K", indicating a newly created conversation with a model that has 128 thousand tokens of memory. The detailed tooltip shows four lines:

Line What it means
Estimated count It is an estimate, not the provider's official bill. It serves as guidance.
Current send How much goes along with the next message.
Raw history The total size of the conversation without any compaction.
Safe input budget How much Curator allows itself to send, saving room for the answer.

The tooltip ends by warning that reading files can change the total of the next call: if the AI decides to read more files, the number rises while it works.

The four context warnings

Warning Meaning What to do
High context The desk is filling up. Consider wrapping up the subject.
Near the limit Almost at the model's limit. Open a "New conversation".
Summary active Part of the old history was replaced by a summary. Nothing; it is automatic.
Will be compacted On the next message, Curator will summarize the old history. Nothing; but note that old details may be lost.

About compaction: when a conversation gets too long, Curator summarizes the older parts instead of simply locking up. It is a good mechanism — but a summary is always poorer than the original. If a detail from the start of the conversation is essential, it is worth repeating it in the current message instead of trusting that it survived the summary.

The "Tokens" and "Cost" cards

Still in the conversation column, two cards track spending: "Conversation tokens", with the total consumed, and "Estimated conversation cost", in dollars. The word estimated is literal: the value is calculated by Curator from the known prices of each model, and the official charge is the one appearing in your account with the provider. Close numbers, but not identical.

Conversations created in older Curator versions are marked as "Legacy history" and "Read only" — their numbers were preserved, but they no longer receive updates.

Five habits that reduce cost

  1. One conversation per subject. When changing tasks, click "New conversation". Staying in the same conversation drags the whole old history along — and you pay for it in every message.
  2. Use @ to point at the file. Saying "@processor.py, the tax calculation line" is cheaper and more precise than "in the file that does the math".
  3. Match the effort to the task. Do not use Maximum effort to rename a variable.
  4. Use Chat mode for questions. It does not read files, so it costs a fraction.
  5. Attach images selectively. An image consumes a lot of context. Attach the one that clarifies; do not attach five screenshots "just in case".

The engine behind it (the "harness")

This section is for those curious about what happens behind the scenes. You do not need it to use the AI Chat. But it explains several behaviors that, without this context, seem odd.

Harness is the industry word for the program that makes an artificial intelligence model actually work, rather than just talk. The difference is large: a model, on its own, only knows how to turn text into text. It does not open files, does not save anything, does not know what exists on your computer. The harness is the surrounding structure that gives the model hands — it offers tools, executes what it asks for, returns the result, and repeats the cycle until the task is done.

An image that helps: the model is a very capable consultant speaking over the phone, who is not in your room. The harness is the assistant who is in the room, with access to the cabinets, carrying out the consultant's instructions and describing back what was found.

The three pieces and where each one lives

Piece Where it lives What it does
Curator On your machine The screen, the approvals, the queues, the teaching, the return points.
The engine On your machine, alongside Curator Runs the work cycle and touches the files.
The AI model In the provider's cloud Reasons and decides what to do.

The engine is a companion program — in jargon, a sidecar, that is, a process running alongside the main application. In Curator it is OpenCode, and it ships with the installation: you do not need to install or configure anything.

The detail that matters most in this split: your files are read and changed on your machine, by the local engine. What leaves over the internet is the text sent to the model — your request, the relevant code snippets, and the conversation history.

The work cycle

This is the heart of the harness, and understanding it explains almost everything you see on screen:

You write the request
        |
        v
Curator assembles the package: request + mode rules + attachments
        |
        v
Curator takes the snapshot of the files (the return point)
        |
        v
   AI model in the cloud  <-------------------------+
        |                                           |
        v                                           |
   What to do now?                                  |
        |                                           |
        |-- "I need to read" ----> Engine runs it --+
        |                          on your machine
        |
        |-- "delicate action" ---> "Important action" card
        |                          waits for you ----+
        |
        +-- "done" --------------> Final answer on screen

Each turn of this cycle is a new decision by the model, made based on what it discovered on the previous turn. That is why the AI sometimes reads four files before writing a single line: it is surveying the terrain. And that is what the progress messages report — "Reading files…" is the cycle in the tool phase; "Thinking…" is the cycle waiting for the model to decide; "Waiting for you…" is the cycle stopped at an approval card.

Why the text appears bit by bit

The answer is delivered in chunks, as it is generated, rather than all at once at the end. This is deliberate and has two practical advantages: you start reading before the answer finishes, and you notice early if the AI misunderstood.

If you notice, use "Stop reasoning" (or the Esc key) and rewrite the request. The conversation is marked as "Reasoning interrupted." and nothing already done is lost: changes already applied remain there, visible in "Changes", and can be undone with "Undo".

The two permission layers

The AI Chat's security does not depend on the model's goodwill. It is applied in two layers, from outside it.

Layer 1 — The mode rules. Before anything else, the engine receives the list of what is authorized in that mode. In Plan mode, for example, authorization to write project files comes denied. If the model tries to write, the engine refuses the action. The model may even "want" to edit; it cannot.

Layer 2 — Your approval. For actions that pass layer 1 but still have consequences outside the files — deleting a queue item, running a browser test, rehearsing a step in Windows — Curator stops the cycle and shows the "Important action" card. The work freezes until you decide.

The logic of separating them: the first layer is a fixed rule you chose when selecting the mode; the second is a case-by-case judgement only you can make.

The safety brakes

Brake How it works Why it exists
Project fence Requests that would touch folders outside the open project are refused automatically. Prevents a misinterpreted instruction from reaching the rest of your computer.
Read limit Huge files are read in chunks, with a ceiling per read. Avoids blowing the context and spending money on a useless read.
Turn limit The cycle has a maximum number of round trips per request. Prevents a task from running indefinitely.
Repetition detector If the AI tries the same action unsuccessfully a few times in a row, the engine interrupts. Avoids the classic case of the AI insisting on the same mistake and burning your balance.

The last one deserves attention, because it is the difference between a task that fails in one minute and one that fails in twenty. When the engine notices the repetition, it stops and the AI reports what got stuck, instead of continuing to try.

Where the conversation and return points are stored

The conversation is stored on your machine and synchronized with your account's cloud. That is why you find the history again when switching computers, and why the "Reconnecting…" status may appear when the internet wobbles.

The return points (the file snapshots) live only on your computer, inside the project itself. That has a practical consequence: "Undo" works on the machine where the work was done. If you continue the same conversation on another machine, the history is there, but the file snapshots are not.

They also have a size ceiling — very large files and very extensive changes may not fit whole. It is a generous safety net, but it is not a version control system. For important work, it does not replace a project backup.

The connection states you may see

State What is happening
Curator connected All set, waiting for your request.
Curator working… The cycle is under way.
Reconnecting… The channel dropped and is being restored.
Retrying… A call failed and Curator is retrying on its own.
Curator failure The engine did not respond. See the problems section.
Legacy conversation A conversation from a previous version; use "Continue in Curator".
Note the "Retrying…" state: transient network failures are reprocessed automatically. Do not interrupt or resend the message when you see it — you would only duplicate the work and the cost.

Common problems and what to do

What you see Likely cause What to do
"Chat blocked — select a project in Automation." No robot open. Open a project from the chat's initial screen or in the Automation module.
"AI Chat disabled — the robot is running." The robot is running right now. Wait for the run to finish; the chat comes back on its own.
The AI explains but changes nothing The mode is on Plan or Chat. Switch the selector to Build and repeat the request.
The AI changed something you did not ask for The request was ambiguous. Use "Undo" and rewrite specifically, using @ on the right file.
Model appears unavailable, with "API Key" That provider's key is missing. Click the label and register the key, or choose a model that already shows "Key ✓".
"Could not complete." The model refused, the key is invalid, or the provider account ran out of balance. Read the full message; check the key and the balance; try another model.
"Curator failure" The engine did not respond. Close and reopen Curator. If it persists, restart the computer before contacting support.
"Reconnecting…" for a long time Unstable internet. Check the connection. Do not resend the message — wait.
"High context" or "Near the limit" The conversation got long. Open "New conversation" and summarize the essentials there.
The AI "forgot" something said at the beginning The old history was compacted into a summary. Repeat the detail in the current message.
Warning to configure the OpenAI key for the narrator AI Voice without an OpenAI key. Register the OpenAI key, even if you use another model in the chat.
Image attachment seems ignored The chosen model does not accept images. Choose a model with the "Img" badge.
Video attachment does not work Only Gemini accepts video. Switch to a Gemini model.
"Could not open the browser now." The Windows browser component is missing. Reinstall Curator; if it persists, contact support.
"Selector in more than one place" in the test The element's address is ambiguous. Use "Edit" and choose a candidate with a high score and the "unique" badge.
"Selector not found in any open tab." The page changed, or the right tab is not open. Open the correct page and capture again.
"is this the one you pointed at?" repeatedly wrong The Windows program draws its screen in a way that is hard to read. Bring the window to the front at normal size, and point again.
Higher cost than expected High effort, long conversation, or many images. See the five habits that reduce cost.

The three questions that solve most cases

When something does not go as expected, check in this order — it is the fastest path to a fix:

  1. Is the right project open? Check the "PROJECT OPEN" band.
  2. Is the right mode selected? If you want the AI to change code, it must be on Build.
  3. Is the request specific? "It is not working" produces a vague answer. "The robot stops at the portal login screen, on the password field" produces a fix.

If none of that solved it, see the Support page. For faster service, provide the robot's name (the one in the "PROJECT OPEN" band), the mode in use and the selected model, the exact error message that appeared on screen, and what you asked for versus what happened.

One-page summary

If you only keep one thing from this page, keep this:
  • The AI Chat works inside a project. Check the "PROJECT OPEN" band.
  • The mode rules: Build changes the code, Plan only plans, Chat only talks.
  • Before moving on, look at "Changes" to see what the AI did. If it got it wrong, "Undo".
  • To teach a website, "Open Browser". To teach a Windows program, "Desktop teaching". Showing is always better than describing.
  • Choose the model according to the task, and the effort according to the difficulty. When in doubt, stay on the default.
  • One conversation per subject. It is the habit that most reduces cost and most improves answer quality.
  • The AI does not run your robots. That button is yours.